You must specify a file for the memory component to initialize memory with. The file is of the format "address / contents". An example would like the following:
00000000 / 080000FC;
00000004 / 00000000;
00000100 / 20010011;
00000104 / ac01003c;
00000108 / 20010027;
0000010c / ac01003d;
RAM components look like this:
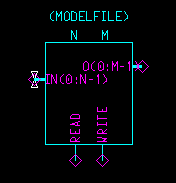
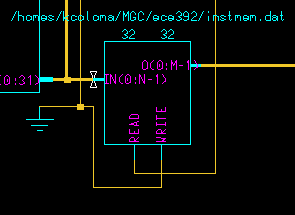
For RAM, you must the number of input bits (N), the number of output bits (M), and the input file.
Similarly, the PLA component needs an input file to use as a truth table. In addition to the reference file, the PLA component also specifies how many input wires and output wires there are. The file should be formated like this where "-" is a don't care bit:
#input / output
1 0 0 0 0 / 0 0 1 0 - 0 ;
0 1 1 0 0 / 0 1 1 0 1 0 ;
1 0 0 0 1 / 0 - 1 0 0 1 ;
1 0 0 1 0 / 1 1 1 0 1 0 ;
The PLA component looks like this:
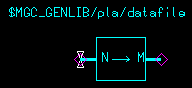
You need to specify the truth file, and the number of inputs (N) and outputs (M).
After making a piece of logic, you can create a custom symbol for further use rather than having to copy and paste each component over and over again. To create a new symbol, first select the "schematic" option under the "Check" menu. Then go to the "Miscellaneous" menu and select "Generate Symbol..."
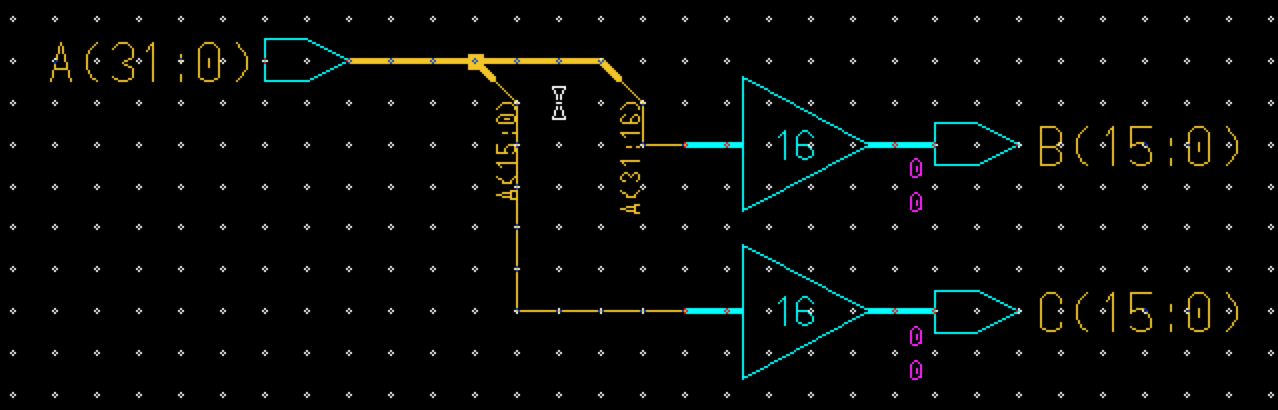
A bus are simply a bundle of wires. On the screen in Design Architect, they are represented by what look like fat wires and are named with the convention busname(31:0). There are a couple ways to rip individual wires off of a bus. One is to use the "rip" components in the library. The other way is to just attach a wire to bus. Either way, you should be sure to specify which wire on the bus you're trying to rip. If you use the latter method, a dialog window will appear in which you can enter the index for the wire. Simulation is exactly the same as usual except you can use hex or decimal values.
Yes! There are probably a couple ways of doing it, but here's one. rip the bus a with a regular wire, and enter an array for the index instead of single digit. Though it looks like a wire, it really does keep all the lines you ripped off the bus. At this point you may want to play with the drawn properties of the wire to make it thicker to look like a bus. The only tricky part to be aware of is that if you're ripping a bus from one bus, and it actually changes nets, the bus will have to go through some sort of gen_lib component like at the very least, a ripper component. Here is an example.
Dofiles are quite simple. The key is to pay attention to the xterms that are started when you open up quicksim. Comments are preceded by "//", and commands typically start with $ signs. Just copy the appropriate commands in to a text file. To run a dofile, bring quicksim to to the forefront and type "dofile filename". You may need to add a relative pathname to the filename.
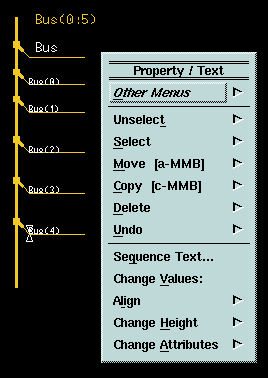
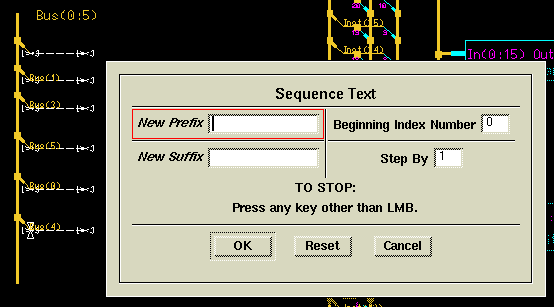
Yes, as a matter of fact, there is. It is a little tricky, and there are multiple ways of going about it, including a rumored keystroke combo. Say you've added 64 wires to bus before you named the net. Once you've named the net, you've got 64 wires which you must then name with the correct indices. If they all need to be named sequentially, then you're in luck. Select all the labels (not actual wire instances), right click and choose "Sequence Text." A dialog will pop up asking for a Prefix, Suffix, start number, and an increment amount. The prefix will contain the first part of the label string, most likely something like "Bus(", and the suffix will most likely be ")", and the starting number 0 and increment amount 1. As a side note, the blue ripper components only need index numbers (no bus name). Hopefully, the following pics will help some.

Yes, see this link for help setting up Mentor Graphics fonts for an Xserver
Lot's of things, actually in Mentor Graphics. A full list of mouse gestures can be found under Design Architect's Help->On Strokes... menu. Here's a brief table of helpful mouse gestures in Design Architect.
| \ (top to bottom) | Zoom in to diagonal area |
| \ (bottom to top) | Zoom to fit all |
| / (top to bottom) | Zoom in |
| / (bottom to top) | Zoom out |
The table along the bottom of the Design Architect window is a context-based list of commands. Each box is tied to a function key, and the position of the command indicates what modifier key to use (shift, control, or alt).